Showing posts with label fondant. Show all posts

Wednesday, March 27, 2013

Princess Minnie Mouse Cake


Princess Minnie Mouse Cake
 
 
Here is another cake from my search of pictures from past birthdays.  This is my very first fondant cake.  My little girl loves Minnie Mouse and Princesses so naturally I had to combine the 2 things. 


The cake itself is covered in fondant and with small fondant polka dots (Of course Minnie Mouse has to have polka dots!) cut out using a small circle cookie cutter.  I did a star icing trim on the cake.  I cut out the name using the cricut cake machine. 


The head of the Minnie Mouse cake is made with a styrofoam ball cut in half.  I'm now kicking myself because I should have used Rice Krispy treats to make the head so it would have been edible too.  The head is covered in gum paste.  I chose to use gum paste because it's harder than fondant and I wouldn't have to worry about Minnie Mouse's ears drooping and of course I didn't want the crown to droop. 


I made the crown by doing a google images search for crowns and I found a crown coloring page.  I used it as a template to cut the gum paste into the shape of a crown.


I made Minnie Mouse's bow by cutting the gum paste into a rectangle and scrunching it up in the middle.  I then took a strip of pink gum paste and put it the middle to make it look more like a bow. 


Here's a view from the back.

Enjoy!

Shayna


Thursday, March 7, 2013

Tiered Birthday Cake with Fondant Bow

My baby is 1!  How did that happen?  I remember the day she was born like yesterday. 

Since I am a super planner (you should have seen all of the lists I had for my wedding).  I have been planning what I would do for her 1st birthday cake forever.

Here's what you'll need:
2 - 6 in. cake pans
2 - 8 in. cake pans
fondant in 4 different colors
gel food coloring (if you plan on dying the fondant yourself)
white buttercream frosting
pink buttercream frosting
dowel rods
Royal icing


Frost the bottom layer with white buttercream and insert dowel rods
 
 
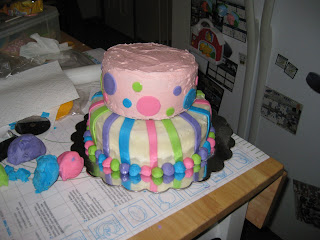
Cut out different colored stripes for the striped layer.  I did 5 of each color.  (Mine were 6 1/2 in long by 1/2 in. wide)
 
 
Place the stripes onto the 8 in cake.  I used water to place the stripes on.
 
Place the next tier on top of the cake
 
 
I added 2 different sized circles to the polka dot layer.
 
 
Here's a better picture of all of the different polka dots I used.  I glued them onto the cake with water.
 
Next onto the bow for the cake!
 
 
I cut out 4 in. strips in each of the different fondant colors and glued them together with water.  I let them dry overnight so they wouldn't bend or break when I put the bow together. 
 
I, of course, got into the zone and forgot to take pictures of how to make the bow, but you can see a tutorial on how to make the bow here
 
 
Here's another view of the bow where you can see it a little closer.
 
Enjoy!
 
Shayna