Wednesday, March 27, 2013

Princess Minnie Mouse Cake


Princess Minnie Mouse Cake
 
 
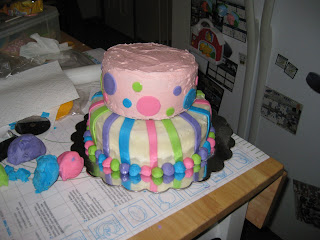
Here is another cake from my search of pictures from past birthdays.  This is my very first fondant cake.  My little girl loves Minnie Mouse and Princesses so naturally I had to combine the 2 things. 


The cake itself is covered in fondant and with small fondant polka dots (Of course Minnie Mouse has to have polka dots!) cut out using a small circle cookie cutter.  I did a star icing trim on the cake.  I cut out the name using the cricut cake machine. 


The head of the Minnie Mouse cake is made with a styrofoam ball cut in half.  I'm now kicking myself because I should have used Rice Krispy treats to make the head so it would have been edible too.  The head is covered in gum paste.  I chose to use gum paste because it's harder than fondant and I wouldn't have to worry about Minnie Mouse's ears drooping and of course I didn't want the crown to droop. 


I made the crown by doing a google images search for crowns and I found a crown coloring page.  I used it as a template to cut the gum paste into the shape of a crown.


I made Minnie Mouse's bow by cutting the gum paste into a rectangle and scrunching it up in the middle.  I then took a strip of pink gum paste and put it the middle to make it look more like a bow. 


Here's a view from the back.

Enjoy!

Shayna


Tuesday, March 26, 2013

Butterfly Cupcake Cake


While I was creating a photo book for my little Cinderella girl's 2nd year (she's 2 1/2 so I'm a little behind) I came upon a few pictures of different cakes I had made for the kids.  This was so simple to do. 

Here's what you'll need:
20 cupcakes
Fruit roll-ups
Black icing
Pink icing
Purple icing
White icing

Each wing is 4 cupcakes and the body is 4 cupcakes.

Enjoy!

Shayna

Wednesday, March 20, 2013

Grilled Chicken Sandwich with Spicy Mayo


I admit it.  I'm a lazy grocery shopper. I'm especially a lazy grocery shopper when I have my kids with me.  They are well behaved, but even the best behaved children have their limits.  My children's limits are usually reached around nap time or meal times.  When I went shopping for the ingredients for this recipe my husband was working on something in the backyard and my 2 1/2 year old was getting hungry.  My mission was to get in and out as fast as possible.  This was one of the reasons I did not have all the ingredients this recipe includes.  If I can't find it quickly then I'm sure I can grab something as a substitute that will be delicious. 

This recipe is perfect for summer when you don't want to heat up the house by turning on the oven or when you would like to do some grilling.  I've also included a vegetarian option as well.

Grilled Chicken with Spicy Mayo  (adapted from favorite family recipes)

Ingredients:
  
  • 4 boneless, skinless chicken breast halves
  • Chicken marinade (see below)
  • 8 slices thick-cut bacon
  • 4 slices provolone cheese
  • 4 fresh kaiser rolls, lightly toasted
  • Spicy Mayonnaise (see below)

  •  
    Chicken Marinade:
  • 1 pkg Italian dressing
  • 1/2 c. olive oil

  •  
    Spicy Mayonnaise:
  • 1 c. mayonnaise
  • 1/4 t. minced garlic
  • 1 tsp. paprika
  • 1 tsp. yellow mustard
  • 1 1/2 Tbsp. hot sauce

  •  
    Instructions:
    1.  Pound chicken breasts until thin and place in ziploc bag.
    2.  Combine marinade ingredients and pour into ziploc bag with the chicken.  Allow to marinade for at least 1 hour.
    3.  Cook the bacon until nearly done.
    4.  Toast the kaiser rolls
    5.  Remove the chicken from the marinade (throw away the marinade) and grill the chicken until cooked through. 
    6.  As the chicken is grilling place the bacon on the grill.  Be careful to not burn it.
    7.  Just before you take the chicken off the grill put the provolone cheese on it.
    8.  Combine the spicy mayo ingredients and spread over toasted kaiser rolls.
    9. Add chicken and bacon to each roll.

    Vegetarian Option
     
    This recipe is so easy to make vegetarian.  I used a Quorn chicken cutlets and Morningstar Farms bacon in place of the chicken and bacon in this recipe.  I cooked it the same way as I did the non-vegetarian version.  It was wonderful!  I didn't miss the meat at all.

    Thursday, March 7, 2013

    Tiered Birthday Cake with Fondant Bow

    My baby is 1!  How did that happen?  I remember the day she was born like yesterday. 

    Since I am a super planner (you should have seen all of the lists I had for my wedding).  I have been planning what I would do for her 1st birthday cake forever.

    Here's what you'll need:
    2 - 6 in. cake pans
    2 - 8 in. cake pans
    fondant in 4 different colors
    gel food coloring (if you plan on dying the fondant yourself)
    white buttercream frosting
    pink buttercream frosting
    dowel rods
    Royal icing


    Frost the bottom layer with white buttercream and insert dowel rods
     
     
    Cut out different colored stripes for the striped layer.  I did 5 of each color.  (Mine were 6 1/2 in long by 1/2 in. wide)
     
     
    Place the stripes onto the 8 in cake.  I used water to place the stripes on.
     
    Place the next tier on top of the cake
     
     
    I added 2 different sized circles to the polka dot layer.
     
     
    Here's a better picture of all of the different polka dots I used.  I glued them onto the cake with water.
     
    Next onto the bow for the cake!
     
     
    I cut out 4 in. strips in each of the different fondant colors and glued them together with water.  I let them dry overnight so they wouldn't bend or break when I put the bow together. 
     
    I, of course, got into the zone and forgot to take pictures of how to make the bow, but you can see a tutorial on how to make the bow here
     
     
    Here's another view of the bow where you can see it a little closer.
     
    Enjoy!
     
    Shayna

    Monday, March 4, 2013

    Removing the Cake from the Pan


    Until recently one of the things I always dreaded about decorating cakes was removing the cake from the pan.  I would do exactly as the directions said and grease the cake pan and dust flour on the outside.  This made a mess (I'm a messy baker) and I would still be left with parts of the cake left in the pan.  When I first discovered this I have to admit I did a little happy dance.  No mess and super easy!

    Here's what you'll need:
    Wax paper (parchment paper won't work)
    Scissors
    Nonstick cooking spray (I used the store brand olive oil)

    On the back of your cake pan place a piece of wax paper and score the edge of the cake pan with the scissors.  This will leave a white line.  Cut around the white line.  Parchment paper won't work because it doesn't leave a mark when scored with the scissors. 

    Spray bottom and sides of the cake pan with nonstick cooking spray.  Place the wax paper that you've cut into the cake pan and spray the wax paper with the nonstick cooking spray.

     
    Let the cake cool and place on a cooling rack to finish cooling
     
     
    When the cake come out it will still have the wax paper off.
     
    Here's the finished product!


    Enjoy!
    Shayna

    Sunday, March 3, 2013

    butterfly cookies

    My little Cinderella girl is a girly girl and loves butterflies and flowers.  When she saw that her brother and sister were getting cakes and cookies for their birthdays she immediately said that she wanted some cookies too.  I figured why not, one more opportunity for me to practice cookie decorating.  I figured I was already doing 3 different cookies that day, why not add a 4th. 

    Here's what you'll need

    Piping icing (I used white)
    Flooding icing (I used pink)

     
    Put dots down the middle for the body of the butterfly
     

    Outline the butterfly and separate the wings.
     
     
    Fill in the butterfly with the flooding icing
     
    I decorated the butterfly in 2 different ways.
     
     
    The first with dots
     
     
    The second with lines.
     
    Enjoy!
     
    Shayna 

    Saturday, March 2, 2013

    Hockey puck cookies

     
    My husband and son are HUGE hockey fans.  My husband and son recently went to an outdoor hockey game.  When they returned my son decided to re-enact the entire game for me.  Right down to the hockey players taking off their skate guards as they were getting ready to go onto the ice.  Of course, we had to have some hockey cookies to help celebrate Wildman's birthday! 
     
    My husband took the camera to work with him on the day I was decorating the cookies so I wasn't able to get pictures of the decorating process.   
     
    Here's what you'll need: 
     
    Black 10 second royal icing
    Piping icing (the colors depend on your favorite team)
     
    Luckily, my son was happy with the simplified version of his favorite hockey teams logo.  The current logo fun to do for one cookie, but not several.
     
    Enjoy!
     
    Shayna